If you’re one of the 595 million people worldwide battling joint pain, your sedentary lifestyle might be the main culprit and your desk chair is ground zero for the attack.
Here’s the modern-day problem: Many of us sit for over eight hours a day. This prolonged sitting forces your hip flexor muscles (like the psoas and iliacus) into a short, tight position. Over time, they get “stuck” that way.
It creates an anterior pelvic tilt, which means your tight muscles are constantly pulling your pelvis forward. This pull puts a huge, non-stop strain on your lower back.
This article gives you a complete 15-minute daily plan. You will learn why you have this pain. You’ll also get 9 specific yoga poses for tight hip flexors. These poses do two things: they stretch the tight muscles and they “wake up” the opposing muscles (like your glutes).
Why Tight Hip Flexors Are the Real Source of Your Back Pain
You might blame your lower back, but it’s often just the victim. The real culprit is a group of muscles you might not even know you have: your hip flexors.
Your hip flexors are a group of muscles, including the psoas and iliacus. Their main job is to lift your knee toward your chest. Think about walking up stairs or bringing your knee up that’s them at work.
When you sit all day, these muscles are stuck in that “on” or shortened position. Imagine a rubber band held tight for hours. Eventually, it loses its stretch.
Your hip flexors do the same. This constant tightness pulls your pelvic bone forward and down. This is called an anterior pelvic tilt.
This pelvic tilt forces your lower back (your lumbar spine) into a deep, unnatural curve. This curve squeezes the bones (vertebrae) in your spine and puts a major strain on your lower back muscles. The result is that chronic, dull lower back pain that never seems to go away.
This problem is getting worse. A 2025 analysis of a Lancet study shows that global cases of osteoarthritis, often linked to inactivity, could hit one billion people by 2050. Medical experts at the Cleveland Clinic and Mayo Clinic confirm the direct link between tight hip flexors and lower back pain.
To fix the problem, you can’t just stretch. You have to stretch the front (hip flexors) and strengthen the back (glutes). This routine does both.
The Problem: Pelvic Tilt
This tilt forces your spine into an unnatural curve, squeezing vertebrae and causing chronic back pain.
1 Billion osteoarthritis cases by 2050! (Lancet Study)
Confirmed by Cleveland Clinic & Mayo Clinic
The 2-Part Fix
Stretch the Front
(Hip Flexors)
Strengthen the Back
(Glutes)
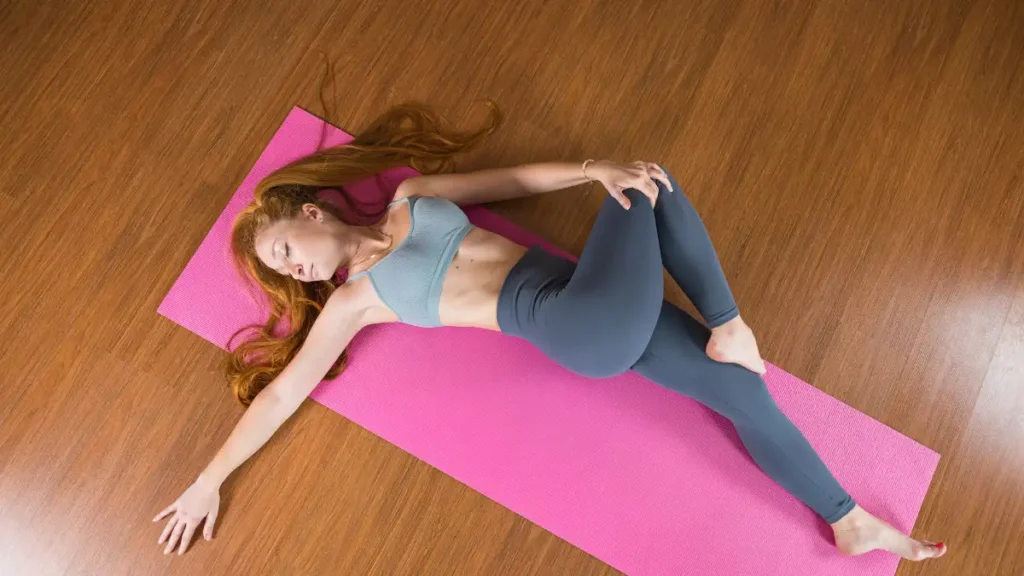
The 15-Minute Daily Routine: 9 Yoga Poses for Tight Hip Flexors
Ready to feel better? Roll out your mat. We’ve arranged these 9 yoga poses for tight hip flexors into a logical flow. This isn’t just a random list of poses; it’s a complete sequence.
As you move, focus on your breath. A simple rule is to inhale to prepare or lengthen, and exhale to go deeper into the stretch.
Remember, consistency is the key. Doing this 15-minute routine every day is far more effective than one long, 2-hour session on the weekend. Let’s begin.
1. Cat-Cow (Marjaryasana/Bitilasana) – The Warm-Up

This pose is the perfect warm-up. It wakes up your spine and starts to connect your breath to the movement of your pelvis. This connection is the first step to releasing your hips. You will flow smoothly between the Cow and Cat poses for about 1 minute, which is roughly 5-8 full breaths.
The most important part is to start the movement from your pelvis, not your neck. Let your head be the very last thing to move, following the curve of your spine.
- Start on all fours with your hands directly under your shoulders and your knees directly under your hips.
- Inhale (Cow Pose): Drop your belly toward the mat, lift your tailbone and chest, and look up toward the ceiling.
- Exhale (Cat Pose): Press the floor away with your hands, rounding your spine.
- Tuck your tailbone under and bring your chin to your chest, feeling the stretch in your back.
🧘Start Position
On all fours: hands under shoulders, knees under hips.
Inhale (Cow)
Belly drops, look up
Exhale (Cat)
Round spine, chin to chest
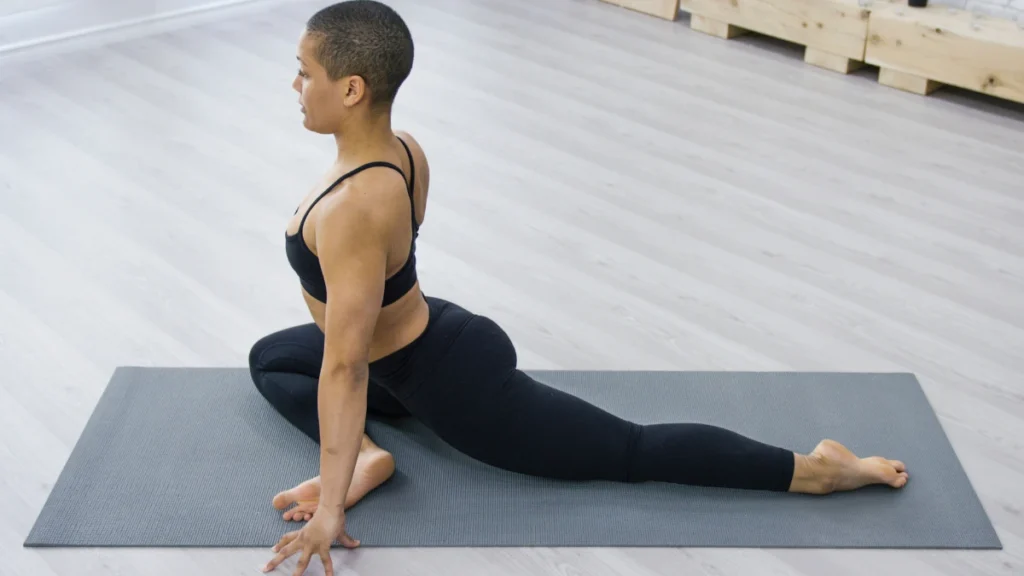
2. Low Lunge (Anjaneyasana) – The Primary Psoas Stretch
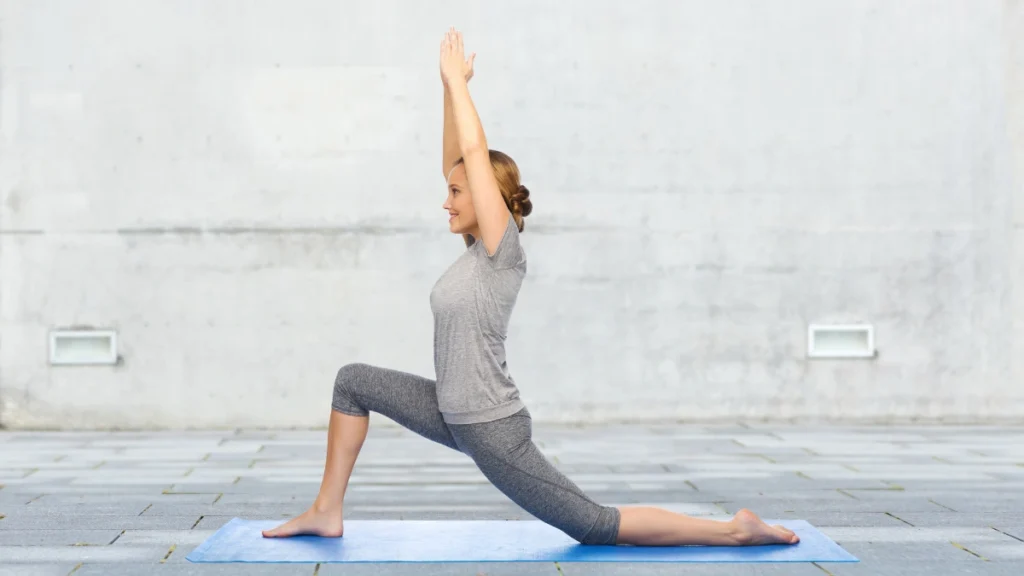
It is the best stretch for your psoas and other tight hip flexors. It directly targets the muscles that get shortened from sitting all day. Hold this pose for 30 seconds, breathing deeply into the stretch, and then switch sides.
The most crucial tip from physical therapists is to tuck your tailbone under (like zipping up tight pants) before you lunge forward. This simple action isolates the hip flexor. You will feel the stretch immediately without even having to lunge very deep, making it safer and more effective.
- From all fours, step your right foot forward between your hands.
- Make sure your right knee is stacked directly over your right ankle.
- Slide your left knee back until you feel a good stretch in the front of your left hip.
- Place a towel or cushion under your left knee for comfort.
- Place your hands on your front thigh or raise them overhead for a deeper stretch.
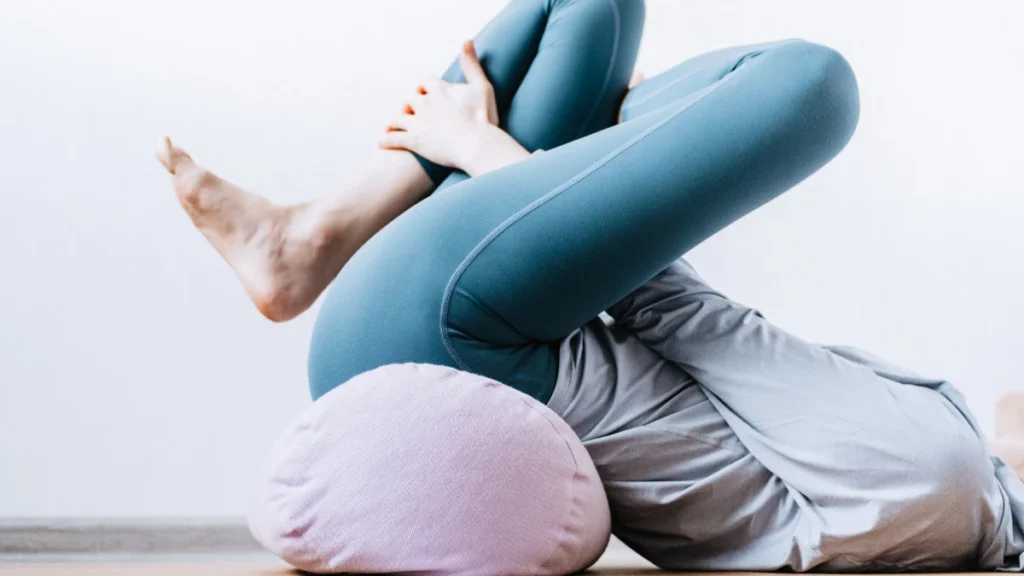
3. Knee-to-Chest (Apanasana) – The Lower Back Release
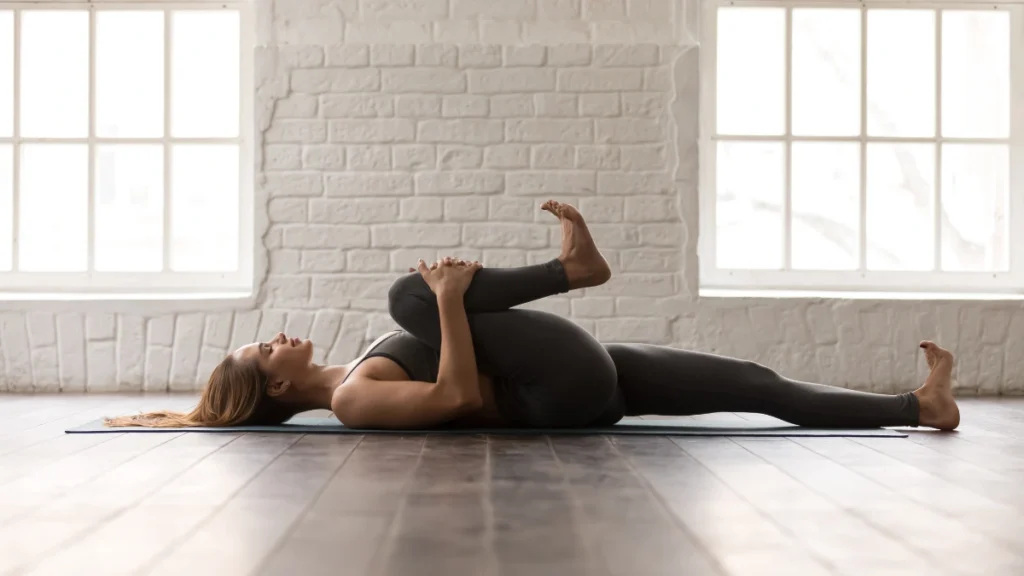
After stretching the hips, this pose gives your lower back an immediate release. It gently stretches the muscles that were strained by your pelvic tilt. You’ll hold this for 30 seconds and then switch to the other side.
The pro-tip here is to create a dual action: gently pull one knee in while actively pressing the other straight leg down into the floor. This active push of the straight leg creates a surprisingly deep psoas stretch on that side while your other side gets a nice back release. It’s a very efficient pose.
- Lie flat on your back.
- Bend your right knee and pull it toward your chest.
- Hold your right shin or the back of your thigh with both hands.
- Keep your left leg straight and actively press it down into the floor.
Knee-to-Chest Stretch
- Lie flat on your back.
- Bend right knee toward chest.
- Hold right shin or thigh with both hands.
- Keep left leg straight and pressed down.
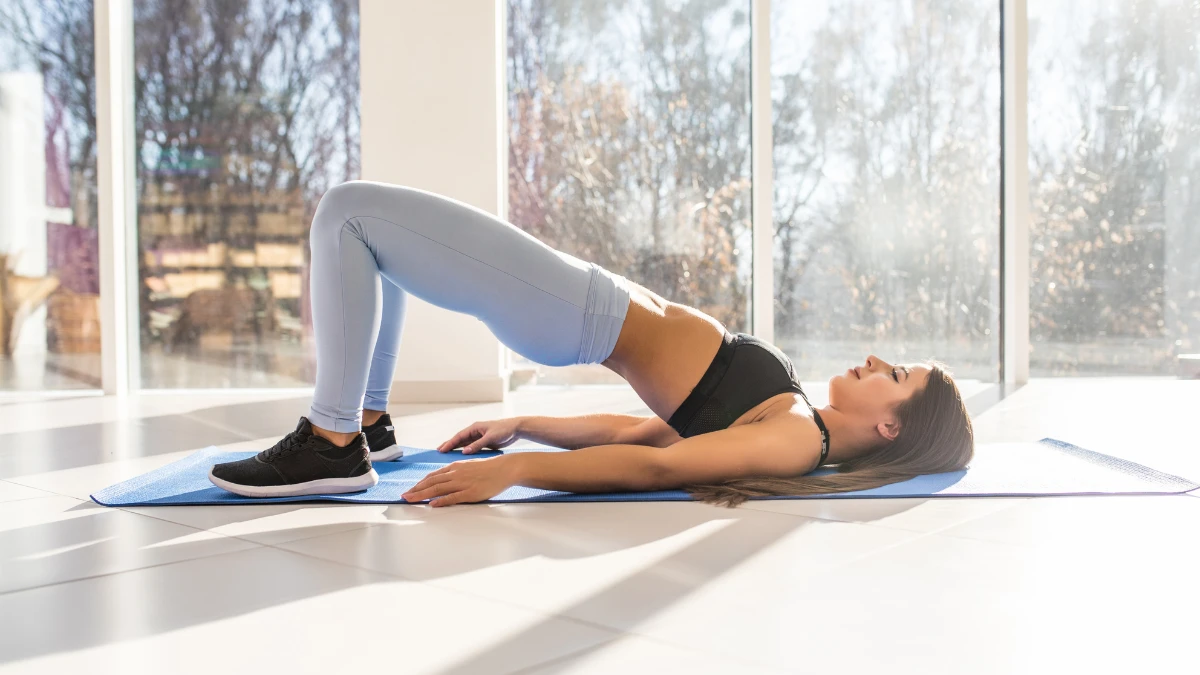
4. Glute Bridge (Setu Bandhasana) – The Glute Activator
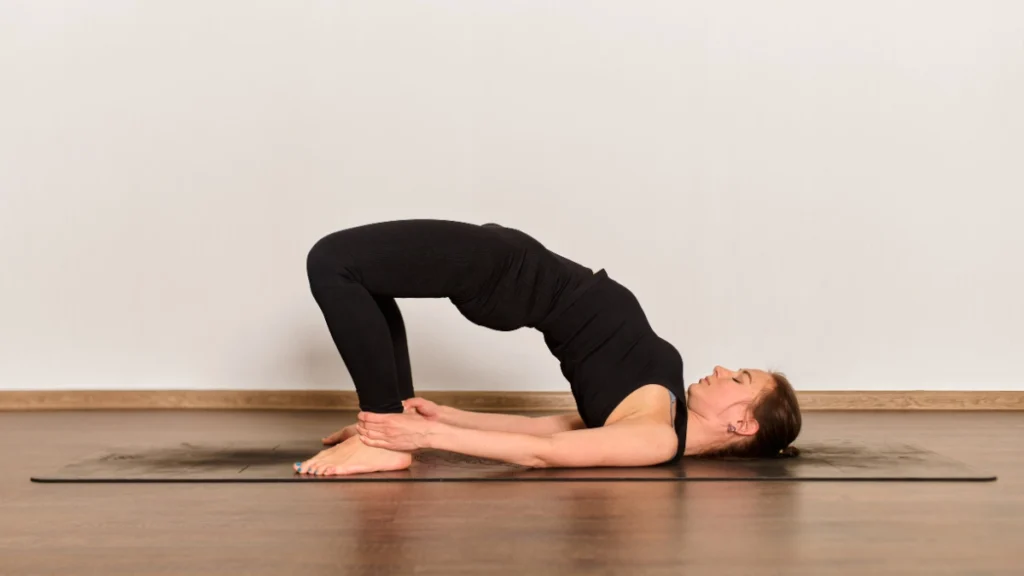
It is where we fix the glute inhibition problem. This pose “wakes up” your sleepy glutes and teaches them to work again, which takes the strain off your lower back. You will repeat this movement for one full minute, holding the squeeze at the top for 3 seconds before slowly lowering down.
The most important thing is to press through your heels and squeeze your glutes at the top. Make sure you aren’t just arching your back to get height. Your glutes should be doing all the work.
- Lie on your back with your knees bent and feet flat on the floor, hip-width apart.
- Place your feet close enough that your fingertips can just graze your heels.
- Inhale: Press through your heels to lift your hips off the floor.
- Exhale: Squeeze your glutes hard at the top, creating a straight line from shoulders to knees.
5. Pigeon Pose (Eka Pada Rajakapotasana) – The Deep Hip Opener
This classic hip-opening yoga pose targets the outer hip muscles, like the piriformis. These muscles can also get very tight and contribute to pain or even sciatica. You’ll want to hold this for 1 minute on each side. Breathe into the tightness; don’t fight it.
The key pro-tip is to keep your hips square to the front. If your right hip is lifting off the floor, place a yoga block or a firm cushion under it for support. This support is crucial and allows the muscle to release.
- Start on all fours (a “tabletop” position).
- Bring your right knee forward toward your right wrist.
- Angle your right shin across the mat.
- Slide your left leg straight back behind you, with the top of your foot on the floor.
- Stay upright for a breath, then walk your hands forward and fold over your front leg.
6. 90/90 Stretch – The Accessible Alternative
If Pigeon Pose is too intense for your knees, this is a fantastic and much safer alternative. It achieves the same outer hip stretch without the pressure. Hold it for 1 minute on each side. You may not be able to lean very far forward, and that is perfectly okay.
The goal is to feel a stretch in your front glute and hip, not to force your chest to the floor. Keep both of your sitting bones on the floor as much as possible to maintain the correct alignment.
- Sit on the floor.
- Bend your right leg in front of you, with your shin parallel to the front of your mat (a 90-degree angle).
- Bend your left leg to the side, with your thigh parallel to the side of your mat (another 90-degree angle).
- Keeping your back straight, slowly hinge at your hips and lean forward over your front shin.
The 90/90 Stretch
- Sit on the floor.
- Right leg bent 90° in front.
- Left leg bent 90° to the side.
- Hinge at hips & lean forward.
7. Reclined Figure-Four (Supine Pigeon) – The Gentle Opener
It is another gentle way to open the hips without putting any pressure on the knees. It’s a perfect pose for cooling down because you have full control over the intensity of the stretch. Hold for 1 minute on each side.
The pro-tip here is to keep your head and shoulders flat on the floor. Use your hands to pull your thigh in toward your chest. Avoid the common mistake of using your hand to push your other knee out and away from you.
- Lie on your back with your knees bent and feet flat on the floor.
- Cross your right ankle over your left thigh, just above the knee.
- Keep your right foot flexed to protect your knee.
- Reach through your legs and grab the back of your left thigh.
- Gently pull your left thigh toward you until you feel a stretch in your right glute.
8. Supine Spinal Twist (Supta Matsyendrasana) – The Back and Hip Release
This pose is the “ahhh” moment of the sequence. It releases tension in your lower back, outer hip, and glutes all at once. It’s a great way to ease lower back strain before you finish. Hold for 30 seconds on each side.
The most important tip is to try and keep both shoulder blades pinned to the floor as your knees drop. This ensures you are getting a true, safe spinal twist, rather than just rolling over onto your side.
- Lie on your back and pull both knees into your chest.
- Extend your arms out to your sides in a “T” shape.
- Let both knees fall gently to your right side.
- Turn your head to look to the left, as long as it feels good for your neck.
- Use your core muscles to bring your knees back to center, then switch sides.
9. Child’s Pose (Balasana) – The Final Release
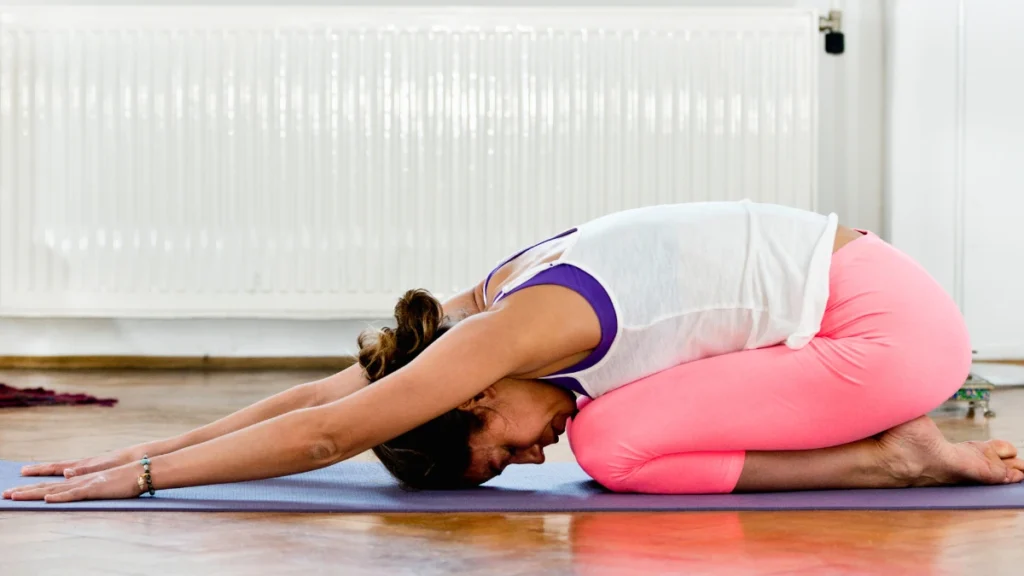
It is a resting pose that ends our sequence. It gently stretches your hips, thighs, and ankles while giving your mind and back a final moment of rest. Hold this pose for 1 to 2 minutes. Focus on your breathing.
Breathe deeply into your back, feeling your back ribs expand with every inhale. The pro-tip for a better hip stretch is to bring your knees wide (to the edges of your mat). This creates more space for your torso to sink down and gives you a deeper inner thigh stretch.
- From all fours, bring your big toes to touch each other.
- Separate your knees as wide as your mat (or as wide as is comfortable).
- Send your hips back to rest on your heels.
- Walk your hands forward and rest your forehead on the mat.
Child’s Pose (Balasana)
- From all fours, big toes touch.
- Separate knees wide as mat.
- Send hips back to rest on heels.
- Walk hands forward, forehead on mat.
Conclusion
See? 15 minutes is all it takes. Relieving tight hips and back pain isn’t just about stretching it’s about restoring balance. By committing to this 15-minute routine, you’re stretching tight hip flexors like the psoas and reactivating dormant glutes. This is the true key to long-term relief.
Bookmark this page. Try this 15-minute flow every morning for one week.difference for you.
Integrating these yoga poses for tight hip flexors into your daily life can be the most productive 15 minutes of your day.